Trike Stand
If you are interested in purchasing a manufactured trike stand, I recommend looking at the stands by TRIKETIGHT at TerraCycle. Otherwise, you are invited to read on and enjoy building your own.
Stand Design Goals
- Assembled from existing components with as little fabrication as possible
- Hold a trike horizontal at a level that supports working in either a standing and seated position
- Adjust to different trike brands and models
- Be mobile
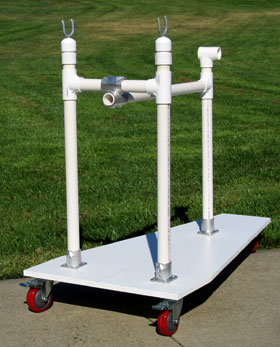
Aluminum Stand
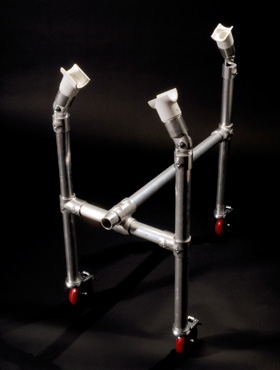
The aluminum fittings are the key to creating the stand and the adjustable elbow in particular makes it possible to align the PVC supports to the trike's frame. The fact that the aluminum, PVC and wheel component dimensions fit together makes it seem custom designed.
The mobility supports the stand's work function but also makes it a storage rack that allows the trike to be moved around with unbelievable ease–it is where I keep my trike.
The aluminum parts can be ordered from the Diamond Aluminum Company. They will cut the pipe to specified lengths and ship everything to you. Web Site: www.diamond-aluminum.com
Phone: 513-821-1080
Note: All prices are out of date.
| Item | Size | Qty. | Unit Cost | Total |
|---|---|---|---|---|
| 1.25" Sch. 40 Aluminum Pipe | 27" | 1 | $7.00 | $7.00 |
| 1.25" Sch. 40 Aluminum Pipe | 24" | 3 | $6.25 | $18.75 |
| 1.25" Sch. 40 Aluminum Pipe | 15" | 1 | $4.25 | $4.25 |
| 100-PC Economy Tee | 1.25" | 3 | $10.50 | $22.50 |
| 200-PC Crossover | 1.25" | 1 | $12.75 | $12.75 |
| 106-PC Adjustable Elbow | 1.25" | 3 | $12.75 | $38.25 |
| PVC Supports (see below) | $10.75 | |||
| Caster City Wheels (see below) | $57.75 | |||
| Total Cost of Parts | $172.00 |
Wheels
The wheels that I specify below have locking mechanisms. The need for this can be debated. My original stand had only one locking wheel–the back wheel–that was used once to keep the stand from rolling away on a sloping surface. I do not typically lock the wheels when working on the trike. Some money can be saved by reducing the number of or eliminating the locking mechanisms.
The stem mount casters specified fit into the pipe, require no fabrication and provide an elegant solution. The actual interior diameter of the 1.25" schedule 40 aluminum pipe is 1-3/8".
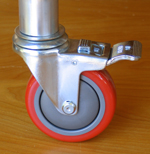
The top casters are from Caster City and can be found on their Expanding Rubber Stem Casters web page (Item Number: 3ARG4X-ER25-ML, Stem - Swivel Caster with Total Locking Brake - Model 3A - Mounting Stem: ER25 Expanding Rubber for 1-3/8" ID pipe). The casters with 4" dia. wheels are $25. Use the coupon code TRIKE for a 20% discount.
The locking mechanism stops the wheel from both rolling and turning. The casters roll easily, smoothly and quietly. They are overkill in terms of their load capacities and are expense but provide a beautiful solution.
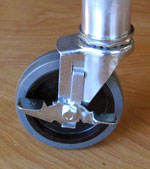
A less expensive solution is from SES Casters and can be found on their Casters R29 Series web page (Item Number: CR29F04SXTX.RPFGGNX), Series R29 Light Medium Duty Expandable Stem, 1-3/8" ID pipe). The casters with 4" dia. wheels are $5.50 each and with shipping cost about $27 for a set of three.
The wheels roll smoothly. The locking mechanism only keeps the wheel from rolling as compared to the Caster City unit that keeps the wheel form both rolling and turning.
If you want fully locking casters, look at the SES Casters T39 Series (Item Number: CT39F04SXLX.RPFGGDX). They cost about $8.10 each.
No Wheel Alternative
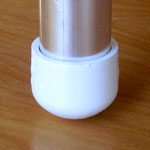
The functionality that wheels provide may not be of value to everyone. In the event that you do not want wheels, use a PVC 1/25" Slip Cap. These cost less that a dollar each making them the most economical alternative. File the end of the caps to remove the small raised burr left from their production.
This solution will lower the height of the stand by over 4." If this is of concern based on your height, add 4" to the length of the three 24" legs.
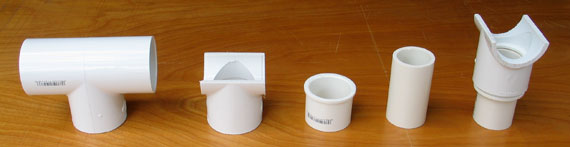
PVC Supports
The size of the specified PVC-Tee slip fittings is based on the size of the cross frame members used by Catrikes. If your trike has larger cross members, choose a larger PVC-Tee and the corresponding bushing to transition to the 1.25" PCV pipe.
The main member on the Catrike is larger than the cross member but I have chosen to use the same size Tee because it provides better clearance for the chain as it shifts on the back cassette. Make adjustments to fit your trike and its configuration.
Most hardware stores stock the PVC pipe and joints. You can usually purchase the pipe in 2' lengths. Only three 3" long pieces are needed. The PVC pieces can be put together without adhesive.
Note: All prices are out of date.
| Item | Size | Qty. | Unit Cost | Total |
|---|---|---|---|---|
| 1.25" PVC Pipe | 24" | 1 | $2.50 | $2.50 |
| PVC Tee Connector | 1.5" | 3 | $1.75 | $5.25 |
| PVC Bushing | 1.5" to 1.25" | 3 | $1.00 | $3.00 |
| Total Cost of Parts | $10.75 |
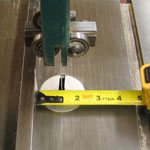
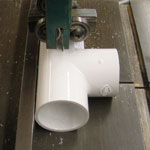
- Cut two PVC-Tees with the fence set at 1.125" (cut through center for front supports).
- Cut one PVC-Tee with the fence set at 1.5" (cut below center for back support).
- Trim the width of the Tees with the fence set at 1.25" (as close to stem as possible).
- Cut three sections of 1.25" PVC pipe at 3" long
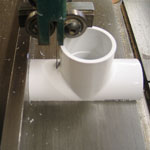
- Sand all cut edges.
- Push a 3" section of pipe into a bushing and the bushing into a Tee.
- Stand the assembly on the cut edge of the Tee and hammer it completely together.
Aluminum Stand Assembly
Inspect the aluminum pipe for rough edges and the fittings for burrs that might keep the pipe from seating completely and smoothly into the fittings. I have found that some filing has been necessary on selected parts. Visually inspect or measure to make sure that the pipe completely seats in the fitting before you tighten the screws.
- Slip an Economy Tee on each of the three 24" pipe pieces (legs).
- Place the bottom edge of the tee at 11" from the bottom of two of the legs (front legs) and tighten the screws. Face the screws to the same side (front or back) of both legs.
- Place the bottom edge of the tee 12.75" from the bottom of the third leg (back leg) and tighten the screw.
- Slide one end of the 27" pipe into the tee on the back leg and tighten the screw. Set aside.
- Slide the Crossover fitting on to the 15" pipe. Do not tighten.
- Lay the front legs across two supports on a flat surface so the tee fittings do not touch anything and the legs are parallel.
- Slide the ends of the 15" pipe into the tees on the front legs and tighten the screws.
- Tighten the screws on the Crossover fitting against the underside of the 15" pipe to provide a little resistance.
- Slide the 27" piece of pipe that is attached to the back leg into the crossover fitting and tighten the screws to hold the pipe firmly. Make sure the back leg is vertical. Make the end of the pipe flush with the front end of the Crossover fitting–this is the position for larger trikes. You will adjust this later.
- With the three legs standing on a flat surface make sure that the front legs are vertical and the Crossover tee is centered between them.
- Tighten the screws that hold the Crossover fitting to the 15" pipe.
- Compress the rubber on the wheel stem so it must be forced into the end of the pipe. Finding the right degree of compression may take a few tries. The stem must fit tight enough into the pipe to allow it to be further tightened once inserted.
- Insert the wheel stems into the legs. I use a rubber mallet to help drive the stem into the leg.
- Turn the swivel bearing/nut to further compress the rubber and secure the stem within the leg.
- Tighten the bolts on the Adjustable Elbows so the can be moved with some resistance.
- Place the Adjustable Elbows on the top of the legs but do not tighten their screws.
- Place the fabricated PVC supports into the Adjustable Elbows but do not tighten the screws.
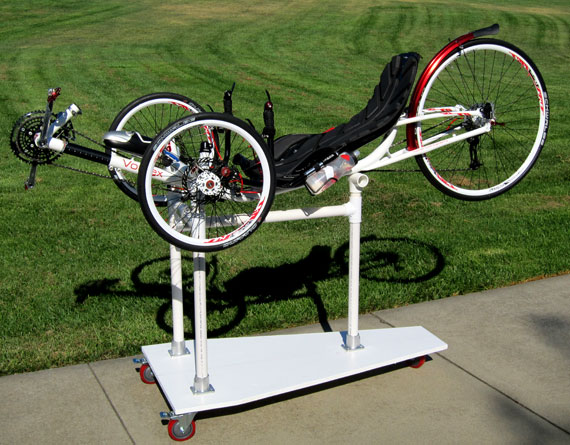
- Place the trike on the stand
- Adjust the angel of the elbows and supports so the PVC supports fit the angle of the trike frame.
- Tighten the screws and bolts.
- Loosen the screws in the Crossover fitting and push the back leg forward as required and retighten the screws and adjust the angle of the back support if required.
- Check the tightness of the screws in all joints.
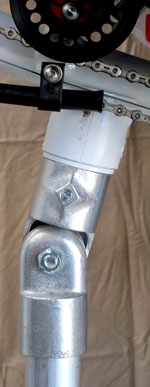
Aluminum Stand for an ICE Trike
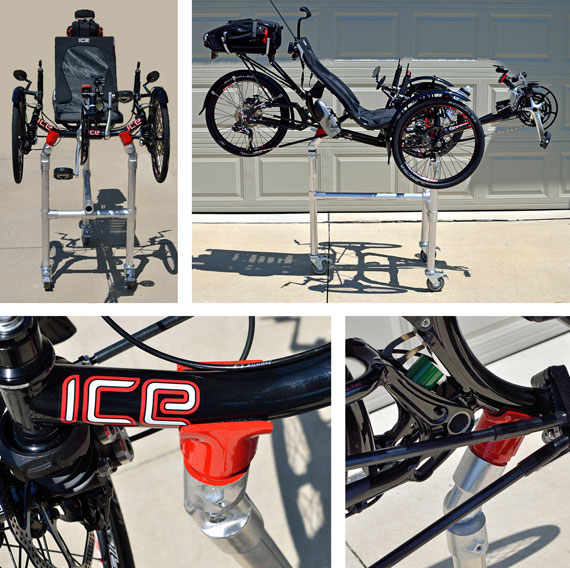
Tom Brohl provided the above images of his ICE trike on the aluminum stand he built. Based on our conversations and his experience, I recommend the following adjustments to the base aluminum stand specifications for ICE Trikes.
Because of where the ICE cross member starts its bend, the distance between the front supports needs to be increased to place the support contact points beyond the bend. This means that the cross piece between the front legs of the stand should increase from 15" to 17" at a minimum as done for Tom's stand. Based on the photo and my experience with my ICE Vortex, I would recommend that the cross member be made 18".
You will notice that the back wheel is higher than the front wheels. This coincides with my experience with my ICE Vortex described below. Tom has since made his back leg 2" shorter—24" to 22".
Tom did a great job building the stand. The PVC parts are painted with Rustoleum spray paint—nice touch. The fabricated PVC-Tees are lined with soft side Velcro. There is room for this because the front ICE cross member is smaller in diameter than on the Catrike.
Rowlock Supports
I have been looking for a support alternative for Catrikes that is similiar to the ICE Tool Hook Suports described below. A friend suggested using rowlocks and that resulted in the following alternative front supports for Catrikes that will also work for all trikes whose structural members measure 1.75" in diameter or less.
Note: All prices are out of date.
| Item | Size | Qty. | Unit Cost | Total |
|---|---|---|---|---|
| PVC Bushing | 1" to 1/2" | 2 | $0.55 | $1.10 |
| PVC Plug | 1/2" | 2 | $0.65 | $1.30 |
| PVC-T | 1.25" | 1 | $1.25 | $1.25 |
| Perko Rowlock Horns | #1227DP0ZNC | 2 | $14.25 | $14.25 |
| Plastic Dip Rubber Coating | Performix | 1 | $6.00 | $6.00 |
| Instant Mix Epoxy | Loctite | 1 | $3.80 | $3.80 |
| Total Cost of Parts | $27.70 |
Rowlock Support Fabrication
- Although the rowlocks are supposed to measure 1.75" between the horns, the ones I received required some filing to allow the Catrike tubes to slide between them.
- Paint the row locks with the rubber coating. The castings are smooth and rounded and this could be skipped.
- Cement the PVC plugs into the PVC bushings.
- Drill a 1/2" hole through the bottom of the 1/2" plugs.
- Epoxy the rowlocks into the PVC bushing/plug units.
- Slide the units onto the front legs of the stand. They will fit loosely. You can add some tape around the bushings to make them fit tighter. The supports should be able to turn to align with the trike members.
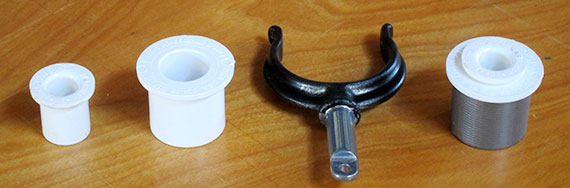
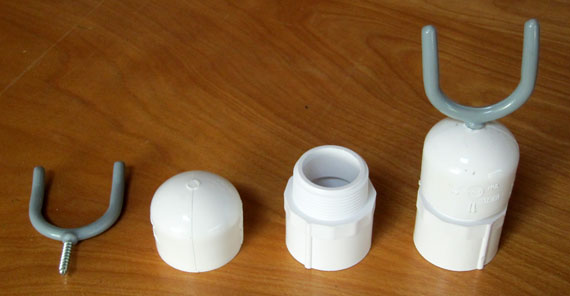
ICE Tool Hook Supports
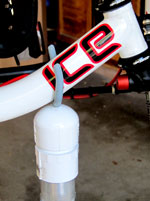
I had investigated this approach earlier but the cross member on Catrikes had too large a diameter. However, the ICE cross member is smaller. It results in a front support that is easier to fabricate and considerably less expensive.
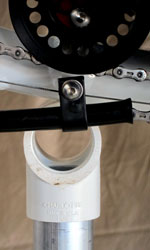
ICE trikes, except the Vortex, should use the standard 15" piece between the two front legs when using the tool hook supports. The ICE Vortex requires that the member be 12" long to position the supports as shown in the photo to the left. The goal is to have the hooks cross the tube at the beginning of the ICE decal.
If the tool hook front supports are used, the back leg of the stand will likely need to be shortened 2 to 3 inches to keep the trike level.
The pieces needed to fabricate the Tool Hook Supports are listed in the following table and shown in the photo along with the finished support.
Note: All prices are out of date.
| Item | Size | Qty. | Unit Cost | Total |
|---|---|---|---|---|
| Vinyl Coated Tool Hook | .25" x 3.5" | 2 | $1.90 | $3.80 |
| PVC Cap | 1.25" | 2 | $1.00 | $2.00 |
| PVC Male Adapter | 1.25" | 2 | $0.75 | $1.50 |
| Lead Removable Split-Shot Sinkers (30) | size 7 | 1 | $2.00 | $2.00 |
| Flow Mix 5 Minute Epoxy | Devcon | 2 | $4.00 | $8.00 |
| Total | $17.30 |
Tool Hook Support Fabrication
- File the top of the PVC Caps to remove the small raised burr left from their production.
- Drill a 5/32"/4mm hole in the center of each PVC Cap where the burr was removed.
- Thread a vinyl coated tool hook into the hole drilled into both PVC Caps.
- Thread the PVC Caps onto the PVC Male Adapters the same amount. Check by placing them next to each other on a flat surface.
- Turn the two supports upside-down and secure them in a vise or by some other means.
- Place a minimum of 15 size 7 split shot sinkers into each unit. This is done to reduce the amount of Epoxy needed to cover the exposed threads of the tool hook. More shot means you need less epoxy.
- Squirt one tube of Devcon Flow Mix 5 Minute Epoxy into each unit. With a minimum of 15 sinkers, this should bring the epoxy near the end of the tool hook threads.
- Let the epoxy cure. The goal of the epoxy is to keep the tool hook from working loose over time given the thinness of the PVC Cap material.
- Slide the units onto the front legs of the stand. The hooks most likely will not be exactly symmetrical so turn them to align their sides.
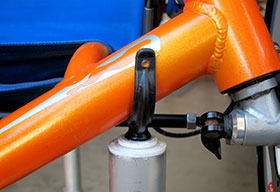
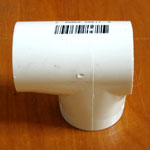
Simple Rear Support
I am the proud owner of an ICE Vortex. When I placed the Vortex on the stand I noticed the rear support interfered with the chain line and rear dérailleur cable.
This lead me to a simple solution that can be used for all trikes and reduces the cost. To fabricate the piece, cut one side off a 1.25" PVC- Tee and replace the original rear support with the modified Tee as shown below. The Tee is installed with the short side toward the drive train. You can cut both sides off the PVC-Tee if desired.
This solves the interference problem and drops the rear down about 2.5" when compared to the original rear support.
It should be noted that any of the front supports described above hold the trike in alignment with the back support.
PVC Plus Aluminum Vortex Stand
The first stand, built with aluminum pipe, used a piece of plywood as a base to which the stand and wheels were attached. This creates a surface that moves with the stand for holding tools and parts while working on the trike.
I choose to use the platform approach for the Vortex stand because the base adds stability when using the more flexible PVC material.
The aluminum crossover fitting and base units provide additional rigidity, simplicity of construction and easy disassembly.
Home Depot sells 2' x 4' by three quarter inch sheets of plywood in a variety of qualities for under $20. This platform is tapered to 9" at the back starting 9" from the front edge.
A mitre box and hack saw do a very good job for cutting the PVC pipe.
Note: All prices are out of date.
| Item | Size | Qty. | Unit Cost | Total |
|---|---|---|---|---|
| 200-PC Aluminum Crossover | 1.25" | 1 | $14.75 | $14.75 |
| 150-S-PC Aluminum Rectangular Base | 1.25" | 3 | $8.25 | $24.75 |
| 3/4" Plywood | 2' x 4' | 1 | $18.00 | $18.00 |
| Caster City Plate Mount Locking Casters | 4" Dia. | 3 | $15.25 | $45.75 |
| Flat Head Screws | 14 x 5/8" | 12 | $0.02 | $0.25 |
| Pan Head Screws | 14 x 5/8" | 12 | $0.02 | $0.25 |
| 1.25" PVC Pipe (cut to lengths below) | 10' | 1 | $5.00 | $5.00 |
| Front Legs | 24" | 2 | ||
| Back Leg | 22.375" | 1 | ||
| Front Horizontal | 12" | 1 | ||
| Front to Back Horizontal | 28" | 1 | ||
| ICE Tool Hook Supports (see above) | 1.25" | 2 | $8.65 | $17.30 |
| 1.25" PVC Pipe (cut to lengths below) | 24" | 1 | $1.25 | $1.25 |
| Support Spacers | 4" to 6" | 3 | ||
| PVC-T | 1.25" | 4 | $1.25 | $5.00 |
| Total Cost of Parts | $132.30 |
PVC Plus Aluminum Vortex Stand Assembly
Inspect the aluminum fittings for burrs that might keep the PVC pipe from seating completely and smoothly into the fittings. Sand the ends of the PVC pipe pieces after they are cut to remove and rough edges so they will fit fully into the PVC joints.
- Cut the plywood into the shape indicated. The back edge of the platform measures 9". The cuts start 9" from the front edge on each side.
- Paint the platform.
- Attach the Casters to the underside of the platform using the pan head screws. The outside screws should be 1" or less from the edge of the platform.
- Glue a PVC-T to one end of each leg.
- Glue the 12" front horizontal into the PVC-T on one of the front legs.
- Slide the 200-PC Aluminum Crossover onto the front horizontal.
- Glue the 12" front horizontal containing the crossover into the PVC-T on the other front leg. Make sure that the two front legs are parallel by laying them across two supports on a flat surface so the PVC-T fittings do not touch anything.
- Glue the 28" front to back horizontal into the T on the back leg.
- Insert the front to back horizontal into the 200-PC Aluminum Crossover. Center the crossover on the front horizontal and tighten the corresponding set screws.
- Make sure the back leg is vertical and tighten the corresponding crossover set screws.
- Slide a 150-S-PC Aluminum Rectangular Base onto the bottom of each leg.
- Center the legs side to side on the platform. The screws for the front legs should be a minimum of 4" back from the front edge of the platform.
- Mark and drill pilot holes for the screws.
- Screw the rectangular bases down to the platform using the flat head screws. Make sure that the screws on the aluminum rectangular bases face the same direction.
- Tighten the set screws.
- Construct the ICE Tool Hook Supports as described above.
- Fabricate the ICE Vortex Rear Support as described above.
- Press a 4" support spacer into the PVC-T at the top of each leg. Do not glue.
- Press the supports onto the support spacers. Do not glue. Not gluing the spacers and supports allows for future adjustments to be made.
Catrike Length Estimates
An Expedition, 700, Speed and Trail have been placed on the stand to establish the dimensions shown in the table below. When a stand with a 24" back leg is shortened to accommodate a Trail it raised the back wheel about 2" above the front wheel. Therefore, the back leg is shortened for the Trail.
The "Crossover Horizontal" dimension in the table is measured from the front end of the crossover fitting to the inside surface of the back leg.
| Models | Crossover Horizontal | Back Leg |
|---|---|---|
| Expedition, 700, Speed, Road | 27" | 24" |
| Trail, Villager | 25" | 22" |
Given that not all pipe pieces fit into all joints perfectly and trikes vary in their dimensions, it will be necessary to use the crossover fitting to adjust the stand to make the trike exactly horizontal.
Terratrike
The Terratrike Cruiser works with a crossover horizontal dimension of 27" and a 24" back leg.